
Maintenance Suggestions: Alpha 2Updated 2 hours ago
Keeping Your Vvolt Alpha II or Alpha 2.1 in Top Shape
Congratulations on choosing a low-maintenance Vvolt Alpha! "Low maintenance" doesn't mean "no maintenance," though. Bikes experience vibration, parts wear, and fasteners can loosen over time. A little regular care will help keep your bike quiet, safe, and running smoothly.
The Alpha II and Alpha 2.1 share the same basic frame, Gates belt drivetrain, hub-drive system, brakes, wheels, and general maintenance requirements. There are two important differences to be aware of:
- Alpha II: 50T front belt ring with a 22T rear cog.
- Alpha 2.1: 50T front belt ring with a 20T rear cog, giving the bike a slightly taller gear ratio.
- Alpha II: Originally supplied with the Original Ranger Battery, which lacks a silver power button and has the charging port above the main battery terminals.
- Alpha 2.1: Supplied with the newer Ranger Battery with Power Button. The silver button lets you energize or de-energize the battery, and the charging port is on the opposite side of the battery.
Replacement batteries may differ from the battery originally supplied with your bike, so identify your battery by its physical features rather than the bike model alone.
1. Keep It Clean
One of the simplest maintenance tasks is also one of the most important: keep your bike reasonably clean.
Dirt, grime, and road debris can accelerate wear on brake pads, belts, bearings, and other moving parts.
- Power down your bike and remove the battery before cleaning.
- Rinse or wipe the bike down as needed.
- Focus on the drivetrain, wheels, brakes, and areas where dirt tends to collect.
- Avoid pressure washers or high-pressure spray, which can force water into bearings and electrical components.
- Avoid spraying water directly into battery terminals, charging ports, displays, or other electrical connectors.
- Allow the battery compartment, electrical contacts, and charging ports to dry completely before reinstalling the battery or charging the bike.
We suggest a little leftover dirt from your last ride as a badge of honor!
2. Brake Maintenance
The Alpha II and Alpha 2.1 feature Shimano MT200 hydraulic disc brakes designed to deliver strong, consistent stopping power with minimal maintenance.
Specifications:
- Mineral oil brake fluid
- ISO 6-bolt 160mm disc rotors
- Deore-style organic brake pads
Brake Pads and Rotors
- Inspect your brake pads periodically. If the friction material is worn to approximately 0.5mm or less, replace the pads.
- Brake rotors should run reasonably straight and should not continuously rub against the pads.
- Howling or squealing may indicate contamination. Scraping can indicate worn pads, rotor rub, or caliper alignment issues.
- Clean brake rotors with isopropyl alcohol and a clean, lint-free cloth.
- Avoid touching the rotor or brake pads with your fingers. Oils can contaminate the braking surfaces.
- Contaminated brake pads may need replacement rather than cleaning.
- Park Tool has an excellent tutorial for replacing disc brake pads.
Brake Bleeding
If your brake lever feels unusually soft or spongy despite good brake pads, air may be in the hydraulic system.
- Shimano MT200 brakes use mineral oil.
- If you already have the correct Shimano bleed equipment and are familiar with bleeding hydraulic disc brakes, you can do this service at home.
- If you've never bled hydraulic brakes before, we recommend having a local bike shop or bike co-op perform the service.
3. Gates Carbon Drive Drivetrain
The Alpha II and Alpha 2.1 use Gates Carbon Drive belt drivetrains. The belt is durable, quiet, and requires considerably less maintenance than a traditional chain.
Both models use an OEM-only Gates Sidetrack 118T belt.
The gearing differs slightly:
- Alpha II: 50T front belt ring / 22T rear cog
- Alpha 2.1: 50T front belt ring / 20T rear cog
The Alpha 2.1's smaller rear cog creates a slightly taller gear ratio, meaning the pedals turn a little more slowly at a given road speed compared with the Alpha II.
For regular maintenance:
- Inspect the belt whenever you clean the bike and give the drivetrain a more thorough inspection every couple thousand miles.
- Look for cracks, damaged teeth, unusual wear, or signs that the belt is tracking incorrectly.
- Clean the belt with water and a soft-bristled brush.
- Avoid harsh chemicals, lubricants, or degreasers. Gates belts do not require lubrication.
- Inspect the front belt ring and rear cog for excessive wear.
- Correct belt alignment and tension help prevent noise and premature wear.
Because the 118T Sidetrack belt is an OEM-only component, contact Vvolt if your belt is damaged or needs replacement.
Persistent clicking, popping, or skipping can indicate issues with belt alignment, tension, the rear cog, or the hub.
Refer to Gates' official maintenance guide here.
4. Wheel Care
Properly tensioned, reasonably true wheels are key to a smooth, predictable ride.
E-bikes are generally heavier than traditional bicycles, are often ridden at higher speeds, and may carry more rider or cargo weight. That means wheels can experience higher impact loads, especially when hitting potholes, curbs, or other sharp bumps. Over time, those impacts can loosen spokes or cause a wheel to go out of true.
- Spin each wheel periodically and watch the rim relative to the frame or fork.
- Significant side-to-side movement indicates lateral wobble.
- Up-and-down movement may indicate a vertical or tire-seating issue.
- Periodically squeeze adjacent spokes together. Investigate any noticeably loose spoke or sudden change in spoke tension.
- Check that axle hardware is secure before riding.
Wheel truing and spoke-tension adjustments require experience and the right tools. If you notice significant wobbling, loose spokes, or recurring spoke problems, we recommend visiting a bike shop.
5. Tire Maintenance
The Alpha II and Alpha 2.1 are equipped with 27.5" x 2.4" CST tires.
You can purchase a replacement tire here.
The tubes use Schrader valves, and compatible replacement tubes are widely available.
Tire Wear
- Check tread and sidewall condition regularly.
- Replace tires that are cracked, damaged, badly worn, or no longer provide adequate traction.
- On the original CST tires, a purple or pink casing layer may become visible once the tread is severely worn. If you can see this layer, stop riding and replace the tire.
Tire Pressure
The pressure printed on the tire sidewall isn't necessarily ideal for every rider.
Rider weight, terrain, riding style, and cargo all affect the best pressure.
Running an appropriate pressure, often lower than the maximum printed on the sidewall, can improve comfort, traction, and rolling efficiency while reducing some types of punctures.
Path Less Pedaled has a useful explanation of tire pressure here.
6. Rear Cog Lockring Inspection
The rear Gates cog is secured to the hub motor with a threaded lockring. Over time, vibration and drivetrain loads can occasionally loosen this lockring.
Common symptoms include:
- Clicking while pedaling
- Popping or movement from the rear cog
- Clicking while backpedaling
- Visible movement between the rear cog and hub
If you notice these symptoms, inspect the rear cog before continuing to ride.
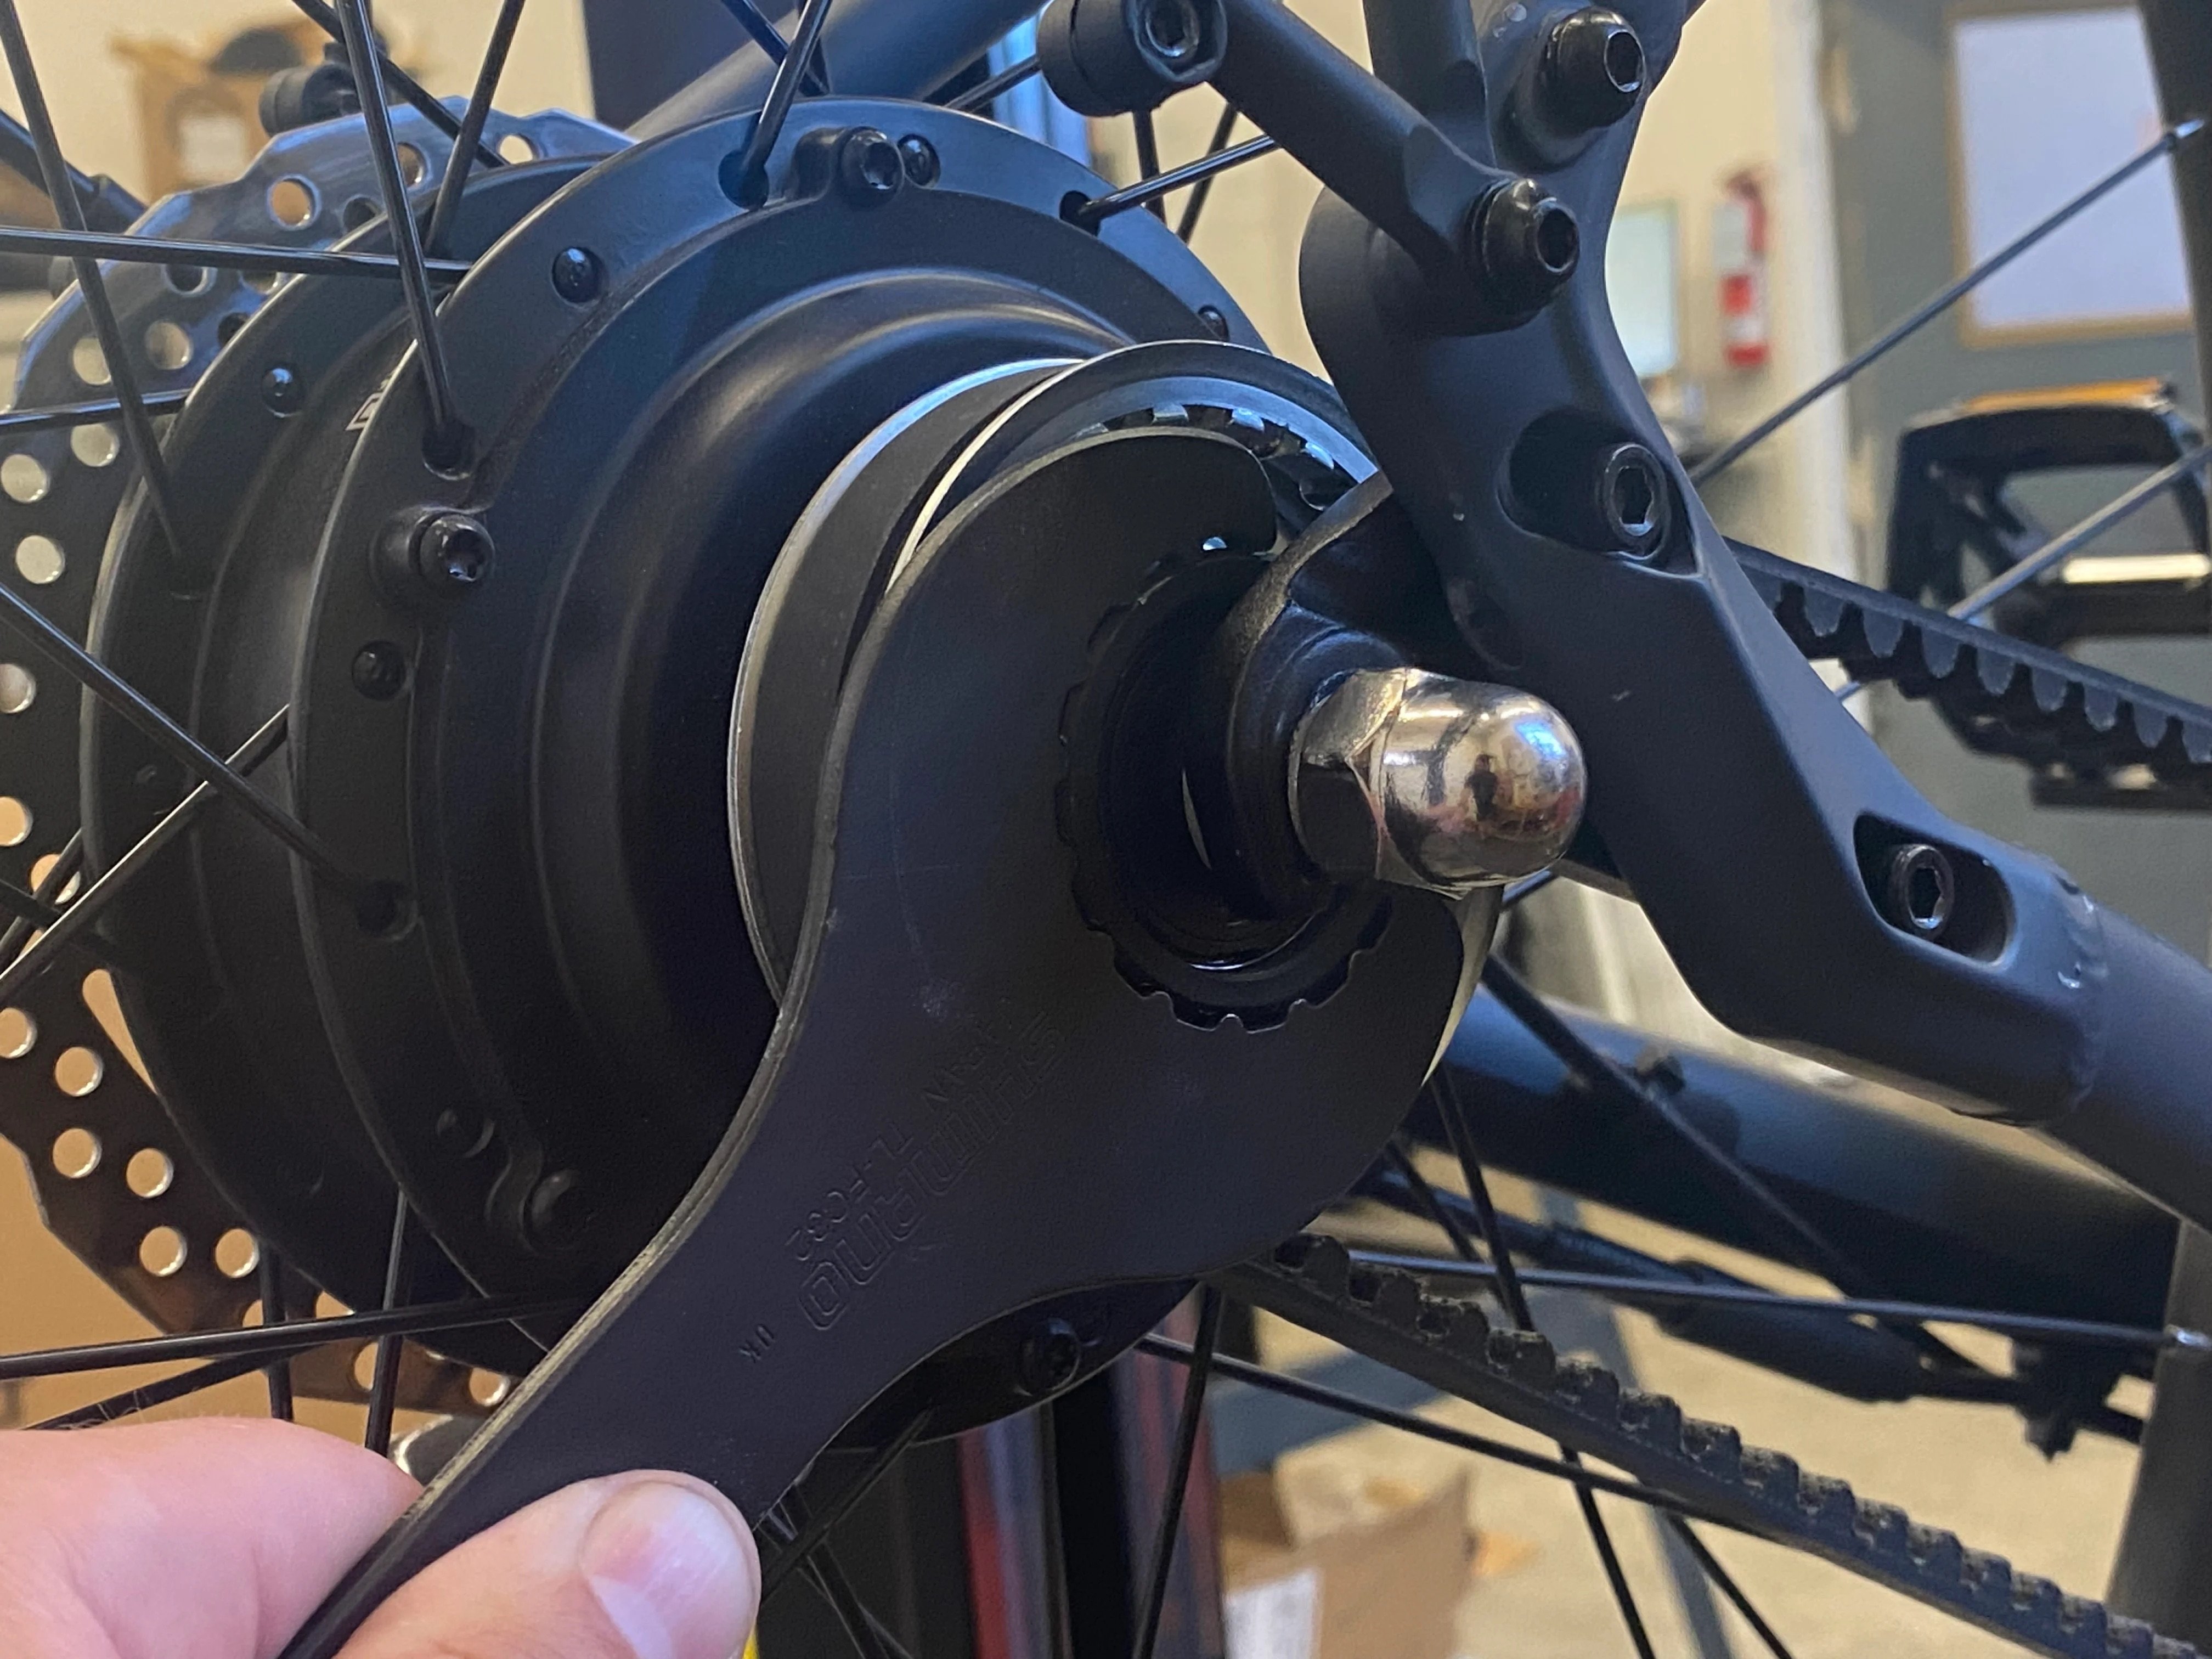
The lockring uses a standard external bottom-bracket style tool interface and can be accessed with tools such as the Shimano TL-FC32 or Park Tool BBT-9.
You can check the lockring with the rear wheel installed or removed.
With the wheel installed
- Support the bike securely on the ground or in a repair stand.
- Fit the TL-FC32 or compatible wrench fully onto the lockring.
- Hold the rear wheel to prevent it from rotating while checking the lockring.
- Tighten the lockring clockwise if it is loose.
With the wheel removed
Removing the wheel generally provides better access and allows greater engagement between the tool and lockring.
Use a Park Tool BBT-9 or compatible external bottom-bracket wrench.
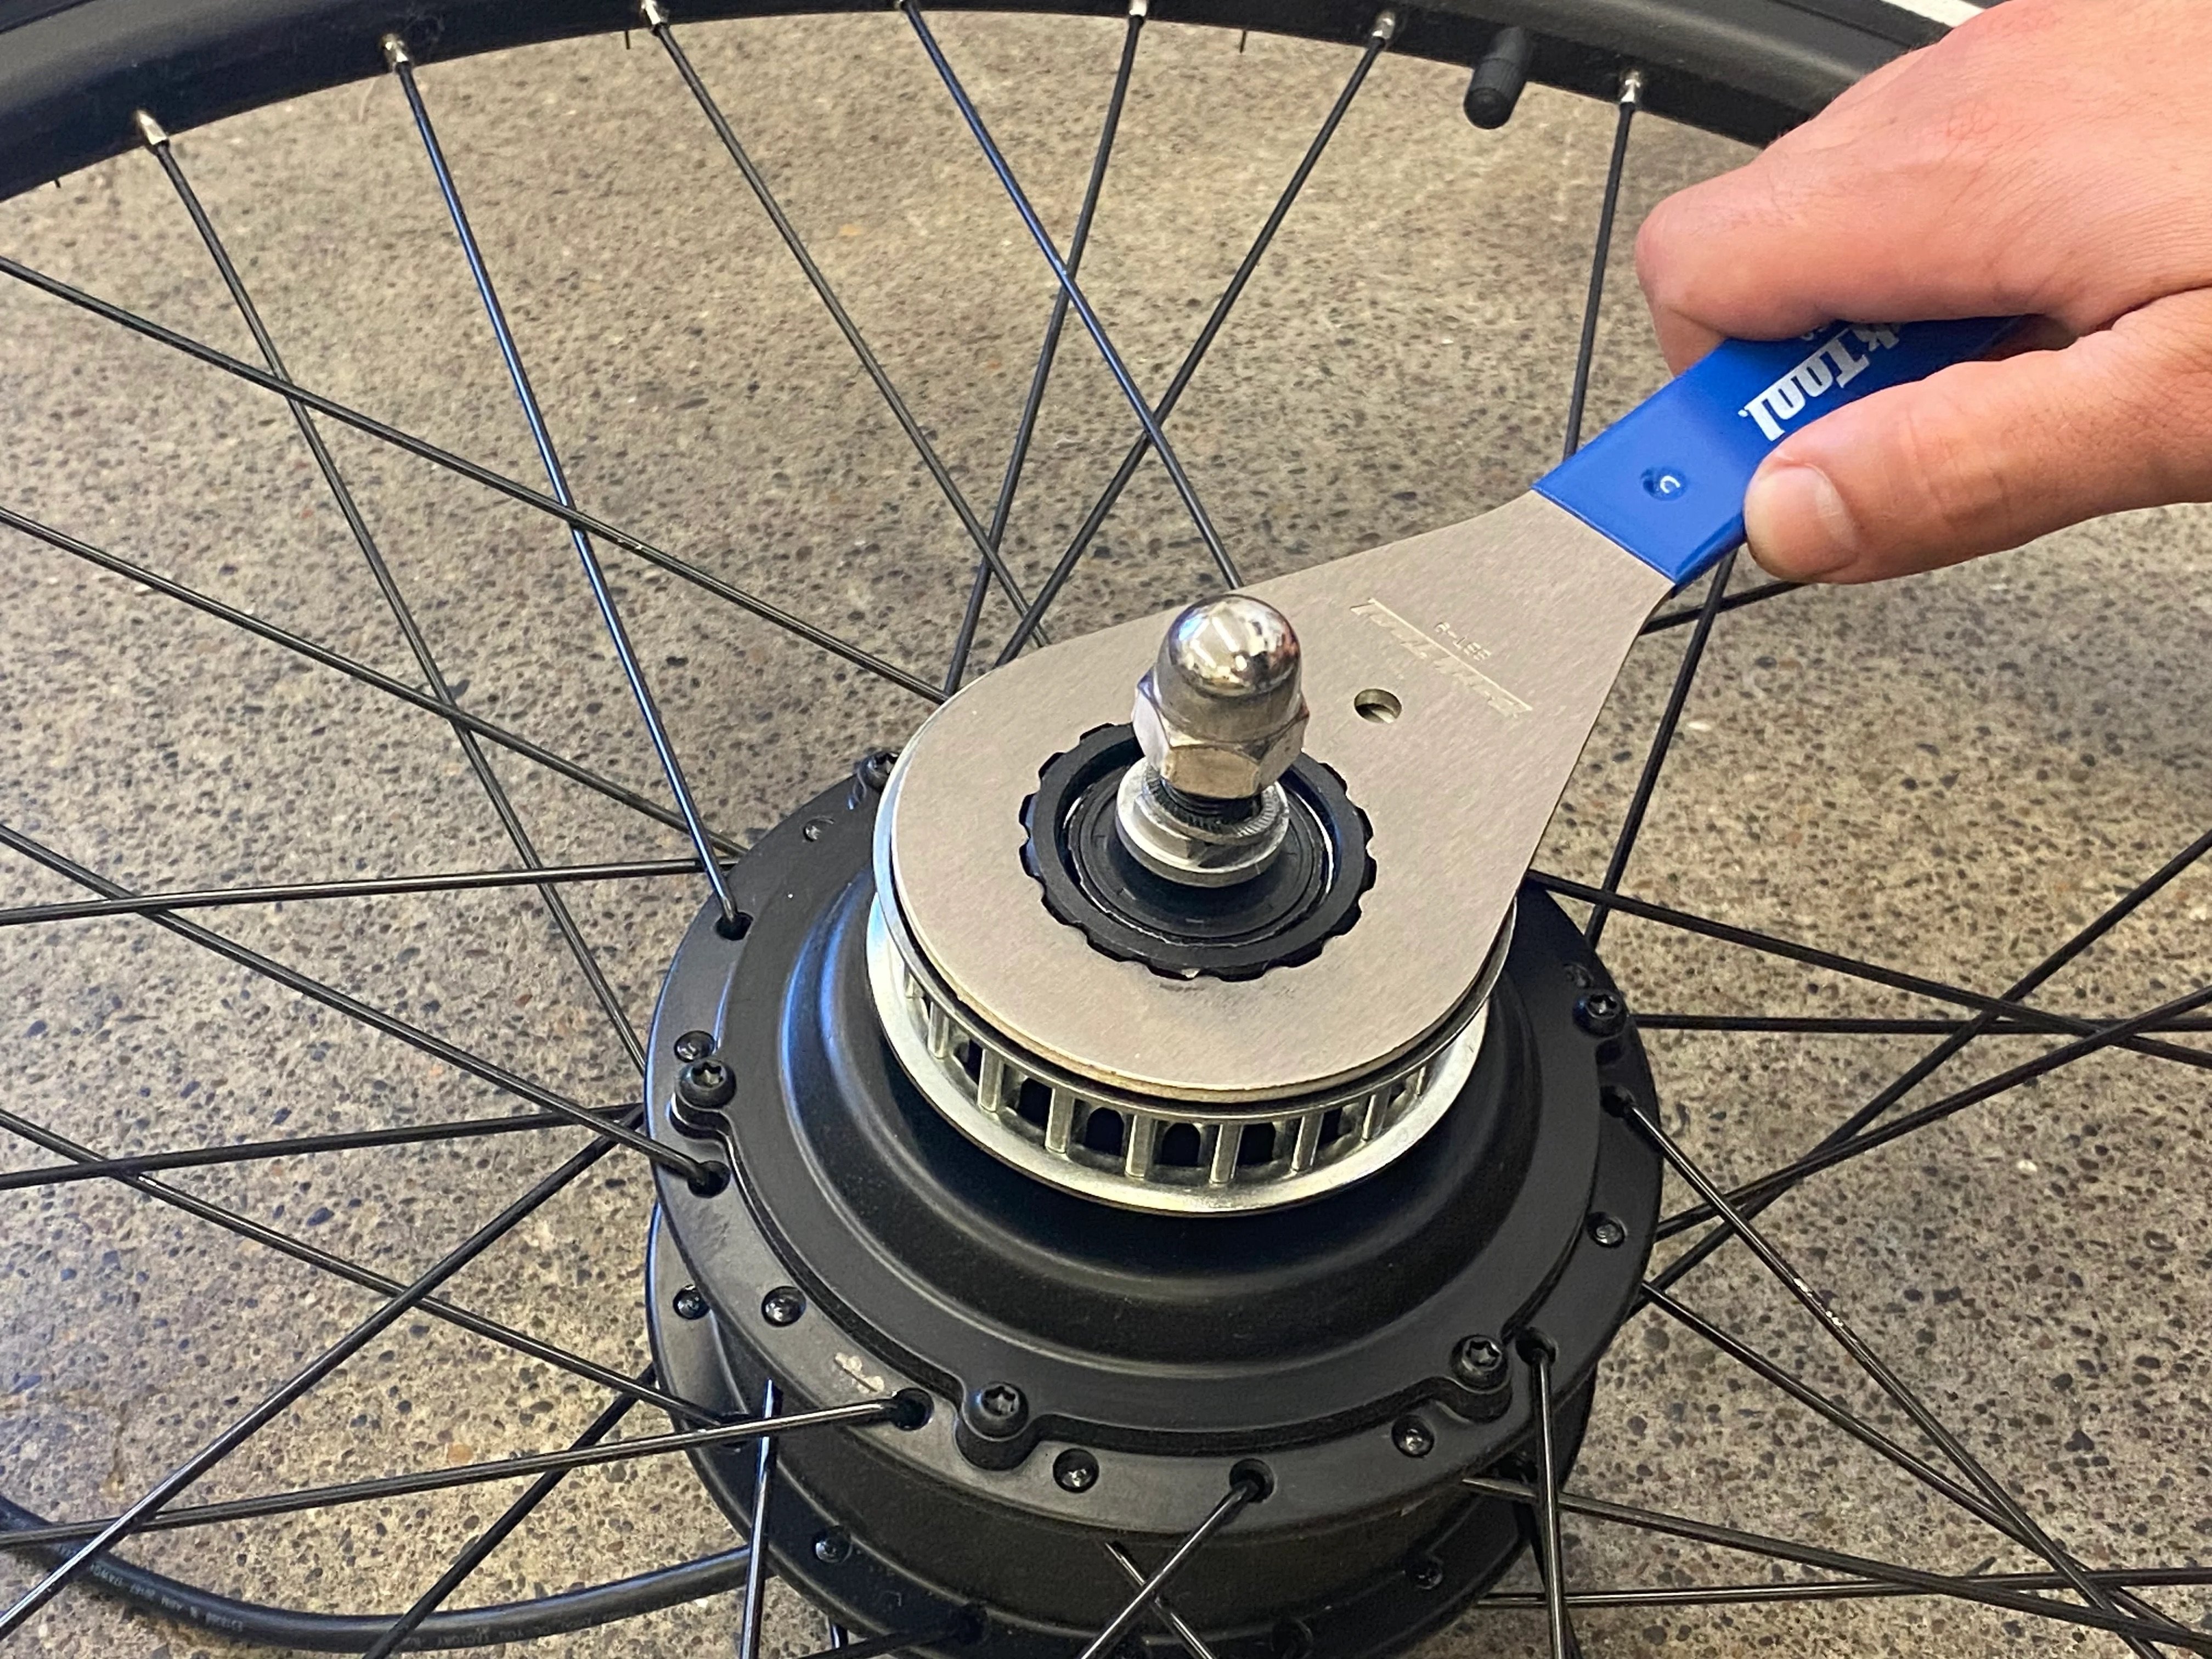
If you need to remove the rear cog entirely, use a Gates Belt Whip or equivalent Gates-compatible strap wrench to hold the cog.
Do not overtighten the lockring. If the lockring repeatedly loosens, the cog has visible play, or you are unsure about the adjustment, contact Vvolt or a qualified bike shop.
7. Battery Care
The Alpha II and Alpha 2.1 may use different versions of the Vvolt Ranger battery.
Original Ranger Battery
Typically supplied with the Alpha II:
- No silver power button
- Cannot be manually energized or de-energized
- Charging port located directly above the main battery terminals
Ranger Battery with Power Button
Originally supplied with the Alpha 2.1:
- Silver power button near the bottom of the battery
- Battery can be manually energized or de-energized
- Charging port located on the opposite side of the battery from the silver power button
If you replace your battery, identify it by these physical features rather than assuming it matches the battery originally supplied with your bike.
For both versions:
- Avoid routinely running the battery completely empty.
- For regular use, keeping the battery between approximately 20% and 80% when practical can help extend its lifespan.
- If you aren't riding regularly, store the battery at approximately 30-50% charge and check it at least every 60 days.
- Do not charge the battery below 32°F or above 100°F.
- Allow a cold battery to gradually warm to room temperature before charging.
- Make sure the charging port and electrical contacts are completely dry before charging.
- Salt and moisture can accelerate corrosion, so inspect the battery terminals and charging port periodically.
- Do not store the battery outdoors for extended periods.
- Only use the Vvolt charger specified for your battery.
If your Ranger battery has a silver power button, de-energize it during charging, when installing or removing it from the bike, and during long-term storage.
For complete battery instructions, refer to the Vvolt Ranger Battery User Manual.
8. Safety Inspections & Bolt Checks
Your Alpha should generally run quietly and predictably. New clicking, ticking, knocking, scraping, or rattling is worth investigating rather than simply riding through it.
Bikes experience vibration, and fasteners can loosen over time.
- Periodically inspect critical fasteners for looseness.
- Tighten loose fasteners to the specified torque whenever possible.
- A torque wrench is strongly recommended for stems, handlebars, cranks, brake hardware, axles, and other safety-critical components.
- Don't tighten every bolt as hard as possible. Overtightening can damage components just as easily as loose hardware can.
Check Your Pedals
Check pedals periodically because a loose pedal can damage the crank arm threads.
- Make sure both pedals remain securely installed.
- Remember that the left pedal uses a reverse thread.
- If a pedal repeatedly loosens, stop riding and inspect the pedal and crank threads.
- A bike shop can sometimes repair damaged crank threads, but continuing to ride with a loose pedal can make the damage much worse.
Bikes can rattle bolts! A quick visual and hands-on inspection every so often can catch small problems before they become big ones.
If you ride frequently, commute year-round, or cover several thousand miles annually, inspect the bike throughout the season rather than waiting for a yearly tune-up.
For lighter use, a thorough annual inspection is usually sufficient.
After a crash, major impact, or unusual mechanical event, inspect the bike carefully before riding again. If you're unsure about the condition of the frame, fork, wheels, brakes, or other safety-critical components, have a professional bike shop inspect the bike.